#How to Increase Virtual Memory in Windows 11
Explore tagged Tumblr posts
Visit Tumblr Blog
Explore Tumblr blogs with no restrictions, modern design and the best experience.
Last Seen Tumblr Blogs


Fun Fact
The “We are the 99%” Tumblr blog became the slogan for the Occupy Wall Street movement.
Text
How to Increase Virtual Memory in Windows 11
Virtual memory (also called the paging file) helps your system run smoothly when physical RAM is fully utilized. By following these steps, you can effectively increase virtual memory in Windows 11 to enhance system performance, especially when running resource-intensive applications or multitasking.
Method 1: Automatic Management (Recommended for Most Users)
Press Windows + S and type “View advanced system settings”
Select the System Properties control panel item
Under the Advanced tab, click Settings in the Performance section
Go to the Advanced tab and click Change… under Virtual memory
Ensure “Automatically manage paging file size for all drives” is checked
Click OK and restart your computer

Method 2: Manual Configuration
Follow steps 1-4 above
Uncheck automatic management
Select your system drive (usually C:)
Choose Custom size
Initial size (MB): 1.5 × your RAM (e.g., 8GB RAM = 12288MB)
Maximum size: 3 × your RAM (e.g., 8GB RAM = 24576MB)
Click Set, then OK
Restart your computer

Tips:
For most users, letting Windows manage virtual memory automatically is the best option unless you have specific performance requirements.
For systems with SSDs, Windows usually manages virtual memory well automatically
Ensure your hard drive has enough free space for the virtual memory file.
Don’t set virtual memory smaller than your RAM size
If you have multiple drives, consider placing the page file on a separate drive to improve performance.
Minimum should be at least equal to your RAM size, maximum up to 4× RAM for heavy use cases
3 notes
·
View notes
Text
MSI Crosshair 17 HX D14V: Explore the uncharted
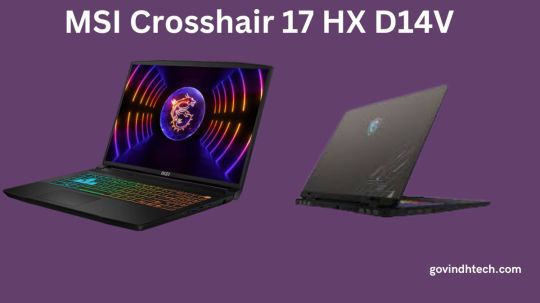
Gaming enthusiasts know how important a powerful laptop is for running their favorite games. Among the most important things you search for are cooling, performance, and monitor display quality. All of these things and more are delivered by the new MSI Crosshair 16 HX D14V/MSI crosshair 17 HX D14V series. Let’s investigate more closely to see what makes these laptops so remarkable!
With state-of-the-art equipment, a brave scout sets out on an epic journey across the vastness of the cosmos.
PERFORMANCE HEIGHT FOR GAMER Whether you’re exploring huge virtual worlds, engaging in epic battles in your favorite games, or broadcasting your gameplay to a global audience, the powerful Intel Core i7 CPU 14700HX guarantees that you may experience lag-free, fluid gaming and realize all of your demands.
GeForce RTX 40 Series Laptops: Beyond Fast NVIDIA GeForce RTX 40 Series GPUs in MSI Crosshair 17 HX D14V The fastest gaming and creative laptops use NVIDIA GeForce RTX 40 Series GPUs. Constructed on the very efficient NVIDIA Ada Lovelace architecture, they allow realistic virtual worlds with complete ray tracing and provide a quantum increase in performance with AI-powered DLSS 3. In addition, the Max-Q technology suite maximizes battery life, power, acoustics, and system performance for optimal efficiency.
AI-powered DLSS 3 boosts creative applications and games, and comprehensive ray tracing creates realistic virtual worlds.
Ray following the hyperrealists: VERY FAST Ray tracing, which emulates the behavior of light in the actual world, is fully unleashed by the Ada architecture. You can enjoy stunningly detailed virtual worlds like never before thanks to the strength of the RTX 40 Series and third-generation RT Cores.
Enhanced Power and Efficiency An powerful collection of AI-powered technologies called NVIDIA Max-Q improves the efficiency of your system. This makes it possible to create tiny, silent, very speedy computers with long battery lives.
REDONE WITH COOLING IN MIND For more effective cooling, the innovative cooling design with its six exhausts enables multidirectional airflow output. You can be guaranteed to obtain the best performance possible when playing hardcore games thanks to features like bigger thermal pipe diameter, MSI-exclusive thermal grease, and shared-pipe design with five heat pipes between the CPU and GPU.
Greater, Clarity, Smoothness An immersive and responsive gaming experience is provided by the QHD+ panel’s amazing visual clarity and smooth, fluid on-screen action, which are both ensured by its 240Hz refresh rate.
DEEPLY ENGAGE IN GAMING AMBIANCE Discover the dazzling illumination of the 24-Zone RGB Keyboard, which includes lighted WASD keys and distinctively crafted keycaps for a stylish and engaging gaming experience!
LOWER LATENCY AND HIGHER BANDWIDTH Take the lead. DDR5 Memory and PCIe Gen5 SSD are both supported by the Crosshair Series.
MUSIC AS IT SHOULD BE Enjoy Hi-Resolution Audio’s superior sound quality while losing yourself in lossless music.
Next Level: Immersion in Audio Experience and listen to audio as intended, then share it over Bluetooth with Nahimic’s in-game 3D surround sound system.
UNBELIEVABLE WIRELESS The latest Wi-Fi 6E provides lightning-fast speeds and lag-free networks even when shared.
WEBCAM QUICKSET With the addition of a Webcam Shutter, users may physically block the camera on the Crosshair 17 HX D14V to protect and preserve their privacy.
ATTACK EVERY BUFFS You may manage and personalize your MSI laptop to your liking with the aid of the special MSI Center.
SEAMLESS PLAY BlueStacks and MSI collaborated on the MSI APP Player, which seamlessly blends PC and mobile gaming.
MSI Crosshair 17 HX D14V features MSI recommends Windows 11 Pro for commercial use. Crosshair 17 HX D14V Intel Core i7 processor 14700HX Windows 11 Home / Windows 11 Pro The most recent 8GB GDDR6 GeForce RTX 4070 laptop GPU Powered by Max-Q Technologies, ultra-efficient Ada Lovelace arch, and NVIDIA DLSS 3 The GPU’s maximum power and discrete graphics mode severely limit performance. The MSI AI Engine automatically modifies a number of system parameters to best suit your requirements. 100% DCI-P3(Typ.), 17″ QHD+ (2560×1600), 16:10, 240Hz Refresh Rate, IPS-Level panel Exclusive Cooler Boost 5 Technology with 6 exhausts design; 24-Zone RGB Gaming Keyboard Ready for High-Resolution Audio
Read more on Govindhtech.com
#msi#MSIcrosshair7HXD14V#MSICrosshair16HXD14V#laptop#IntelCorei7CPU#GeForceRTX40Series#wifi6e#technology#technews#govindhtech
0 notes
Text
Virtualbox 5.2 For Windows 7 32 Bit

Virtualbox 5.2 For Windows 7 32 Bit Download
Download Virtualbox For Windows 10
Virtualbox 5.2 For Windows 7 32 Bit Free
Oracle VM VirtualBox Base Packages - 6.1.26. Freely available for Windows, Mac OS X, Linux and Solaris x86 platforms under GPLv2: Platform. Windows Installer. Solaris 10 5/08 and later or Solaris 11. First, create a new virtual computer on VirtualBox. Select Windows Server 2016 (64-bit) in the operating system selection window in the steps for creating a VM. After preparing the MS Server 2019 virtual machine, run the virtual machine by clicking the Start button. Configure the language, time settings, and keyboard layout for MS Server 2019. Virtualbox 32 Bit - downyup. VirtualBox for Windows 7 - original software that allows you to experiment with operating systems. Creates a virtual machine, allows you to set iron parameters within certain limits. The advantage is the modular architecture and the presence of internal logic. Suitable for users with an average level of skills.
Run Android on your PC
VirtualBox How To
The following are instructions on how to run Android-x86 inside VirtualBox. Note: For optimal performance, make sure you have enabled either VT-x or AMD-V in your host operating system's BIOS. Android-x86 versions tested against Virtualbox versions.
Date TestedVirtualboxHost OSAndroid-x86Result??2.2.4Windows XP??Good??3.0.2Fedora 11??GoodNov. 2 20175.2.0Windows 106.0-r3 32/64 bitGood
Downloading
Download an ISO of Android-x86 from here.
Caution
If you are using Android-x86 for debugging purposes, some binaries (gdb for example) are built for 32-bit architectures and will not support debugging 64-bit binaries such as the Android app host. Download a 32-bit distribution instead.
Create a new VM
If you have not already created a VirtualBox virtual machine for Android-x86 yet, do so as follows:
Click the 'New' button, and name your new virtual machine however you like. Set Type to Linux, and Version to Linux 2.6 / 3.x / 4.x. Note that you should choose the appropriate bit type for the version of Android-x86 that you downloaded.
Specify how much RAM will be allocated to your virtual machine when you run it. Android doesn't specify a bare-minimum requirement for memory, just keep in mind what apps you plan on running. 2GB (2048MB) is a good place to start, and you can change this later if you need to.
Create a new Hard disk image which will act as your machine's storage. The recommended starting size of 8GB is enough. Click through the rest of the options for creating your Hard disk.
Your virtual machine has now been created. It still needs to be initially installed at this point.
Settings
Tested on VirtualBox 64-bit for Windows, version 5.2.0. Android-x86 version 6.0-r3, both 32-bit and 64-bit. Select your machine, then click the Settings button and refer to the below recommended configuration to make sure your settings match.
(System)Recommended: Processor(s) should be set above 1 if you have more than one virtual processor in your host system. Failure to do so means every single app (like Google Chrome) might crush if you try to use it.
(Display):
Optional: Video Memory may be increased beyond the minimum selected automatically. The affects of this are unknown.
Mandatory: Unless guest additions are installed(1), change the default VMSVGA to VBoxVGA.
Optional: Enable 3D Acceleration may be checked. The Linux Guest Additions must (VirtualBox v6.1+) / may (VirtualBox v6.0 and below) need to be installed(2)(1) to get any benefit from this.
Failure to do so means you won't even be able to launch Android-X86 in the first place.(3)
(Storage) Find the first 'Empty' item (this should have an icon of a CD). In the Attributes, click on the CD icon with a small down arrow, and pick 'Choose Optical Virtual Disk File...'. Specify the Android-x86 ISO that you downloaded.
(Audio) Intel HD Audio seems to be natively supported in Android-x86.
(Network) By default, your installation of Android-x86 will be able to automatically connect to the internet. If not, you can try to enable WiFi in Settings/Network & Internet, and connect to showing VirtWifi. If you do not want to connect to the internet in VirtualBox, uncheck Enable Network Adapter under the Adapter 1 tab.
Install
Click the green Start arrow to power-on your virtual machine. You'll be presented with a list of options. Use the arrow keys to pick which one you want, then press Enter once the one you want is selected.
If you don't want to install Android-x86 yet and just want to test it, pick one of the Live CD options (except for Debug mode).
Pick the Installation option if you want your system to be installed to the virtual hard drive.
If you want to use higher resolution, you can edit the boot option by pressing TAB, change vga=788 (800x600) to vga=791 (1024x768) or vga=794 (1280x1024), and press Enter. You can also use vga=ask to see all available modes. But please note Android will only work under 16-bit mode.
Partition
When you are prompted to Choose a partition:
If you upgrade Android-x86 from a previous version, just select the existing partition. Agree to overwrite it when prompted.
If this is a new VM, choose to Create/Modify partitions. Use Bootable but not GPT! This will cause the GRUB installation to fail later.
You may partition your disk however you see fit. If you just want a simple installation, create one partition taking up the entire disk and format it as ext4.
Continue through the installation. You should install GRUB when it prompts you to. You may also leave /system as read and write when prompted. Once the installation is complete, force close/shut down the virtual machine and remove the ISO from the virtual CD drive. Finaly, start Android-x86. If it's a new machine, once loaded you can perform the Android setup to begin using your machine.
Advanced
Custom partitions, SDCard
When booting Android-x86, you may specify which partitions represent the data and sdcard. On the boot menu, select an entry you would like to boot from, press TAB, then add the following as it suits your needs: DATA=sda1 SDCARD=sda2 Press Enter to boot. These options specify user data (your setting, your uploaded applications, ...) go into /dev/sda1, and data saved in sdcard go into /dev/sda2. If you build the ISO from source, you can add these options to bootable/newinstaller/boot/isolinux/isolinux.cfg. Here is a note from David when using fdisk:
Create a new virtual machine with a hard disk.
Launch the Live ISO in Debug mode (I used android-x86-2.2-generic.iso) to get the commend prompt.
'fdisk /dev/sda', then type:
'n' (new partition)
'p' (primary partition)
'1' (1st partition)
'1' (first cylinder)
'xx' (choose the last cylinder, leaving room for a 2nd partition)
'w' (write the partition)
Repeat #3, but call it partition 2, and use the remaining cylinders.
'mdev -s'
'mke2fs -j -L DATA /dev/sda1'
'mke2fs -j -L SDCARD /dev/sda2'
Reboot ('reboot -f')
At the boot menu, choose VESA, then hit TAB and type so that the end of the line reads: 'DATA=sda1 SDCARD=sda2'. (Only need for the generic target images, for VM target images, this is not needed)
After booting (and of course disabling mouse integration via the machine menu), the SD card is read as unformatted, but you can format it by going to Settings > SD card & phone settings > Format SD Card, then Mount SD card.
The SD card should now work!
Note: for the step 7, if you want to format to vfat only, then you can do : Also remember the partition type has to be fat32 (b or c). By using vfat, the step 10 is not needed. DevTools application has a MediaScanner which (re)indexes your SD card for cases where you manually copied media over. This ensures that you see new images and/or music in the apps without having to reboot. If you downloaded it from within android, the application asks the relevant service to index new files.
Playing music
This section describes two ways to upload music files into Android running on a vbox so you can play them by the Music app. Of course, you can save the files to the virtual disk mounted at /sdcard, as described above.
Upload files by adb
Adb is Android Debug Bridge, a tool to debug Android system. If you compile from source, it is located in out/host/linux-x86/bin/adb. Otherwise you can get it from Android SDK. Suppose the network of your vbox is OK, you can upload a file from your host by
ADBHOST=<ip of vbox> out/host/linux-x86/bin/adb push <a music file> /sdcard
You need to know the ip of your vbox. You can get it by Alt-F1 and netcfg. You may also need to reboot Android to see the uploaded files. Of course in this way you have to mount /sdcard to a virtual disk partion. For complex network settings of the VirtualBox VM, you should refer to Debug How To on how to connect adb to the VM.

Upload files by wget
You can also upload files by wget in the debug mode. In the debug mode shell, before entering Android,
# cd /android/sdcard # netcfg eth0 dhcp # wget <url of a music file>
Then type exit to enter Android.
Debug with adb
This section describes the way to debug Android with adb via network.
Virtualbox 5.2 For Windows 7 32 Bit Download
If we want to debug with adb via network, we should ensure the ip of vbox can be accessed by host machine. So we should change the Network Adapter type of vbox to Bridged Adapter. After starting the android-x86, we should follow the above Settings/(Network) section to ensure the network of android-x86 is enabled, and enable USB debugging in Settings/System/Developer Options. Then we can get the device ip from Settings/System/About tablet/IP address. For example, if we see the ip address is 192.168.0.116, then we can use following command to connect android-x86 in vbox from host machine.
Then you can use adb command to debug android-x86 such as get log, and dump system information.
References
Download Virtualbox For Windows 10
Virtualbox 5.2 For Windows 7 32 Bit Free
^ ab VirtualBox currently has no Guest Additions for Android.
^ VirtualBox v6.1.0 states: 'old style 3D support (with VBoxVGA) has been completely removed'
^ VirtualBox states: 'Note that you must install the Guest Additions on the guest VM to specify the VBoxSVGA or VMSVGA graphics controller.'
1 note
·
View note
Text
VMware is one of the best Type-II hypervisor technology and cloud computing software provider. It allows one to run another operating system inside your current operating system i.e Windows, Linux e.t.c. Normally, it bases its virtualization technology on bare-metal hypervisor ESX/ESXI in x86 architecture. Vmware was founded in 1998 as a subsidiary of Dell Technologies. It has the following features: Increased efficiency and stability of data center systems Better provisioning of applications and resources Virtual desktop infrastructure Cloud management platform Has SDDC platform, a software stuck with vSphere, VMware vSAN and VMware NSX Improved networking and security i.e VMWaer NSX Simplified data center and cloud infrastructure Vmware has two major versions, namely; VMware Workstation player – This is a basic VMware verison andn is non-commercial VMware Workstation Pro – Normally, this is a paid version that is more advanced and professional as well. The VMware Workstation Pro has the following additional features: Allows snapshots Ability to create Linked Clones and full clones Remote vSphere Host Power Control Virtual Network Customization (NAT, network rename) Virtual Network Simulation (Packet Loss, Latency, Bandwidth) Allows creating and managing Encrypted VMs By the end of this guide, you should be able to install VMware Player Workstation 16 on Debian 11/10. Further, I will demonstrate how to make an installation with VMware. System Requirements. The minimum requirements for a host system to be able to install VMware are: CPU – above 2GHz and 64-bit processor Memory – above 2GB RAM Disk Space – Depends on the host operating system, but you should have some space about 30GB free for Virtual Machine installation Also remember, to get better performance, you should have a hardware virtualization (AMD-v/VT-d/VT-x) extension enabled from the BIOS of your host system. Then install the required packages. sudo apt update sudo apt install build-essential gcc perl bzip2 dkms make sudo apt install linux-headers-$(uname -r) Update your system to the latest stable packages: sudo apt update && sudo apt upgrade Install VMWare Player | Workstation Pro 16 on Debian 11/10. In this guide, we will install both the VMWare Player 16 and the Workstation Pro 16 on our Debian 11/10 system. Step 1 – Download VMware Player | Workstation Download VMware workstation pro and player using the provided links below VMware Workstation Player 16 Download VMware workstation Player from the official VMware Workstation downloads page Alternatively, obtain the download link and pull it with Wget as below. wget https://download3.vmware.com/software/WKST-PLAYER-1624/VMware-Player-Full-16.2.4-20089737.x86_64.bundle Vmware Workstation Pro 16 This version of VMware can be downloaded by visiting the official VMware Workstation Pro downloads page. While on the above page, select Workstation Pro for Linux and proceed with your download. Another way to download the bundle is by using Wget as below: wget https://download3.vmware.com/software/WKST-1624-LX/VMware-Workstation-Full-16.2.4-20089737.x86_64.bundle Step 2 – Install VMware Player | Workstation Pro 16 Now with the bundle downloaded successfully, proceed and install it. If you downloaded it from a browser, then you need to navigate to your downloads directory cd ~/Downloads Then make the downloaded file executable as below. # For VMware Player chmod +x VMware-Player-Full-*.x86_64.bundle #For VMware Workstation Pro chmod +x VMware-Workstation-Full-*.x86_64.bundle Now with the file executable, install it on Debian 11/10 as below. #For VMware Player sudo ./VMware-Player-Full-*.x86_64.bundle #For Workstation pro sudo ./VMware-Workstation-Full-*.x86_64.bundle The installation will commence as below. Extracting VMware Installer...done. Installing VMware Installer 3.0.0
Installing VMware Workstation 16.2.4 Copying files... [################ [################ [################ [################.... .......... Configuring... [######################################################################] 100% Installation was successful. As seen from the output above, the installation is successful now we need to install the required VMware modules i.e VMnet and VMmon. Git clone the modules as below. git clone https://github.com/mkubecek/vmware-host-modules.git cd vmware-host-modules git checkout workstation-16.2.1 make sudo make install sudo /etc/init.d/vmware start Use VMware Player 16 | VMware Workstation Pro 16 on Debian 11/10. Now that we have installed VMware successfully, we will proceed and use it. I will demonstrate this by installing Alpine Linux. Launch Vmware from the App Menu as below. Accept the License Terms. Accept updates for VMware. Join the Customer Experience program. If you want to license the Workstation Pro, enter your License here, otherwise proceed with the second option. You will see the pop-up below. That is it, proceed and create a virtual machine and install your required Operating system. Creating a new VM will require you to make configurations. Select the type of configuration to use. Select the ISO file of the Operating system you want to install. Proceed and select the type of operating system you want to install on the VM. Assign a name to the VM. Set the disk size of the VM. That is it! You have created a VM with the configurations given, you can alter the settings made by clicking on Customize Hardware. Click Finish then proceed and install the OS of choice. For this guide, I installed Alpine Linux. You can manage your VM, shutdown, start and pause using the panel shown. Fix the “VMWare Kernel Module Updater” error on Debian 11/10. In day-to-day use, you may encounter the error “VMWare Kernel Module Updater“. Fix it by cloning the patch code from GitHub as below. sudo apt -y install git git clone https://github.com/mkubecek/vmware-host-modules.git Rebuild and install the VMware modules. cd vmware-host-modules make sudo make install Then reboot your system for the changes made to apply. sudo reboot You can install VMware Guest additions/Tools to enable full integration between your host system and the Virtual machine. Install VMware Tools on Debian 11/10 with the aid of the guide below. How To Install VMware Tools on Debian Voila! Conclusion. We have come to the end of this guide on how to install VMware Player | Workstation Pro 16 on Debian 11|10. I hope you learned a lot from this guide.
0 notes
Text
Better nreoloutiuon oin mac os vmware

#Better nreoloutiuon oin mac os vmware how to#
#Better nreoloutiuon oin mac os vmware mac os x#
#Better nreoloutiuon oin mac os vmware install#
#Better nreoloutiuon oin mac os vmware Patch#
#Better nreoloutiuon oin mac os vmware how to#
In this article, we have reviewed step by step how to change the screen resolution for the macOS High Sierra 10.13.4 virtual machine installed on Oracle VM software. This time the screen resolution is configured as 2048×1080! As a result, you can easily change the screen size of the VM you use with the value you want. I noticed if you go into displays under settings if you increase the monitor count, you can increase the video memory to a max of 256 MB. If you want to try a different resolution size again, type a different value in the X section and apply the command on the CMD. Re: How to improve GPU card Mac High serria. When I’ve unchecked the Use full resolution for Retina display under VMWare display settings - the icons on the desktop are way too big and t. Thing is - I can’t seem to change my resolution. It is full offline installer standalone setup of VMware Fusion 11 Pro macOS freeload for compatible version of macOS. My host is El Capitan which is running on a MacBook Pro. VMware Fusion 11 Pro freeload macOS New and latest Version for macOS. The display resolution of the High Sierra virtual machine is configured to 1920×1080. Hey, Installed MacOS 10.12 (Sierra) on a VMWare. Now open the VBox program and run the virtual machine. Paste the code into the CMD and press Enter. Then type in the resolution you want to change to the X part of the code and copy the code. Because you are running multiple operating systems on a single server, you can imagine that the.
#Better nreoloutiuon oin mac os vmware mac os x#
Install the Mac OS X as like guest OS installation in VMware Workstation.You can also access Command Prompt (Admin)by pressing the Windows Key + X keys together.Īfter opening the CMD prompt, first, move into the VBox folder. With VMware Server, you run virtual guest operating systems inside a host operating system.
You will be able to select MAC OS as option in VMware Workstation.
Right click on install.cmd file and select run as administrator.
For Windows Select the Windows folder and open it.
and to make it better, on a PC running Windows Read on for more information: Ever since Apple made the move to Intel processors, hackers have been trying hard to modify the x86 version of OS X to run on a PC. Lately, several websites have copied and posted up the text on these pages.
#Better nreoloutiuon oin mac os vmware Patch#
The latest Unlocker is having patch for Windows, Linux, Fusion 4.0 on Snow Leopard and Lion and VMware ESXi 5. This is a System Preferences pane to change screen resolution on your macOS guest. Mac OS X 10.4.8 Tiger x86 VMware Installation Guide.
#Better nreoloutiuon oin mac os vmware install#
I heard there were two options: either I install Mac OS X natively, but the installation discs are awfully picky, or I could use VMWare Workstation on a really powerful. One the VMware Workstation installation is completed If its possible, Id like to use Mac OS X (and all the programs that run on it, like iTunes, Final Cut Pro and Safari, lets say) on a PC, just like I could if I bought a Mac.The size within the guest macOS auto-resizes. Simply grab the corner of the VM window on the host Mac, and grow/shrink the VM window. Then you should be able to redefine your virtual display resolution. The resolution is OK, but graphic tasks are very slo. In the Name the Virtual Machine window, name the virtual machine and virtual machine directory. In my PC is installed an Asus RX580 4GB but the virtual machine runs with a graphic card of 128MB of GPU ram. Select Apple Mac OS X in the Guest operating system section and select macOS 10.14 in the Version section. After it completes, your guest macOS restarts. Running macOS Catalina in Windows10 with VMware 15.5 The system runs perfectly with only one very important problem: the display type. I have tried to install MAC OS X 10.7.1 on VMware Workstation Virtual Machine. This mounts an installer app within the Finder of your guest OS. The below blog explain you how to install MAC OS X 10.7 on VMware Workstation Virtual Machine,there are many methods around and this is one of it.
0 notes
Text
Bes optimizer for windows 10

BES OPTIMIZER FOR WINDOWS 10 UPDATE
BES OPTIMIZER FOR WINDOWS 10 DRIVER
BES OPTIMIZER FOR WINDOWS 10 WINDOWS 10
BES OPTIMIZER FOR WINDOWS 10 PRO
BES OPTIMIZER FOR WINDOWS 10 FREE
Navigate to the Advanced tab and click the Change… button. Enter “performance” in the search box and select “Adjust the appearance and performance of Windows” as shown in Figure 11:įigure 11 - Windows Settings Right-click the Start button and select “Settings”. The cleanup process took approximately 45 minutes to complete when I ran it for the first time.įigure 10 - Disk Cleanup in progress Virtual Memory Settings in Windows 10Īnother way to realize performance gains is by adjusting the size of the paging file.
BES OPTIMIZER FOR WINDOWS 10 WINDOWS 10
Running this tool once a month should improve the performance of your Windows 10 VM dramatically. Now, the Disk Cleanup tool shows that 3 GB of space will be reclaimed.
BES OPTIMIZER FOR WINDOWS 10 UPDATE
You need to click the “Clean up system files” button and select the checkbox for “Windows Update Cleanup” as shown in Figure 9:įigure 9 - Disk Cleanup Tool with Windows Update Cleanup option selected
BES OPTIMIZER FOR WINDOWS 10 FREE
Note that in Figure 8, performing the cleanup will free up less than 10 MB. The Disk Cleanup tool is located at Control Panel -> System and Security -> Administrative Tools. It turns out that Windows keeps copies of all updates, and performing a normal Disk Cleanup does not remove these files even when they are completely redundant. I noticed that I was constantly running out of hard drive space, and would allocate more space from the host OS to improve performance. One of the main causes of slower performance in my Windows VM turned out to be caused by Windows Update. Speed up I/O at the cost of increased memory usage in the host OSįigure 7. vmx file:Ĭonfiguration settings to add to. If you would like to read a detailed comparison of these two NICs and others which can be used with VMWare, check out this page.įigure 6 - Network adapter properties for E1000E and VMXNET3 within WindowsĪdd the following lines to the. VMXNET3 is a virtual NIC which is optimized for use in a VM and is not based on a physical part ( Figure 6 shows how the two NICs are displayed in Windows) Changing this value should drastically improve network performance. vmx file:įind ethernet0.virtualDev = “e1000e” and change it to ethernet0.virtualDev = “vmxnet3”.Į1000E is the default value and is recognized by Windows as an Intel 82574L Gigabit NIC. Right-click on your VM while holding the ⌥ (ALT) key and select Open Config File in Editor. There are other hidden options within this menu, try holding the ^ (CTRL) key or ⌘ (CMD) key and the menu item will change to Show Config File in Finder and Open Latest Log File, respectively. If you press and hold the ⌥ (ALT) key, Show in Finder will change to Open Config File in Editor.įigure 5 - Menu options available with the ALT key pressed Right click on the VM as shown in Figure 5. Ensure that it is completely shutdown and not in a suspended state. If the list of virtual machines is not visible, go to Window -> Virtual Machine Library.įigure 4 - The virtual machine library can be accessed from the Window menu vmx file is from the list of virtual machines in the main VMWare Fusion window. vmx file, you will not be able to boot your VM.įigure 3 - TextEdit Preferences menu showing location of Smart quotes setting If this option is checked and you save the. Make sure Smart quotes is unchecked (See Figure 3 below). vmx file itself, launch TextEdit and open the Preferences menu. You can easily make changes that render the VM unusable or unable to boot!īefore changing the. There are hundreds of additional configuration options which can only be modified by editing the. VMWare only exposes a small number of settings through the UI. Also, select “Pre-allocate disk space” as shown in Figure 2:įigure 2 - Hard Disk Settings Settings in the. On the Hard Disk Settings page, expand the “Advanced options” menu and change the Bus type to SCSI.
BES OPTIMIZER FOR WINDOWS 10 DRIVER
I also saw a performance boost by changing the driver for the hard drive bus type to SCSI. Also, select “Enable hypervisor applications in this virtual machine” as shown in Figure 1.
BES OPTIMIZER FOR WINDOWS 10 PRO
I found that a combination of 2 processor cores with 4096 MB of memory works best for my needs (Note: My MacBook Pro has a 2.8GHz Intel quad core i7 with 8 GB RAM and Intel Iris GPU with 1536 MB). I’ve documented these steps below to help others who find themselves in a similar situation. Thankfully, after changing a few settings and clearing unnecessary files I was able to improve the speed and responsiveness of both my Mac and the Windows 10 instance. However, the performance of the VM degraded significantly over time, especially with multiple Visual Studio projects open in the VM and resource-hungry programs running on the Mac simultaneously. For the first month or so everything ran smoothly. Since I’m a Mac user, I run VS on a Windows 10 instance with VMWare Fusion. The majority of my work consists of C#/.NET development, and Visual Studio+ReSharper is my preferred IDE.
0 notes
Text
My NBA 2K21 Hack Mod

💾 ►►► DOWNLOAD FILE 🔥🔥🔥 Forgot your password? By Ballin Hoop Director. Updated July 9. Updated July Updated June 5. Updated June Updated 12 hours ago. Updated Saturday at PM. Updated May Updated Monday at AM. Updated July 7. Existing user? Files Followers 0. Park mc online and offline full ability badge virtual prestige clothes actions are all unlocked Online and offline full capacity full badge full hot zone Unlock hidden functions, edit players Block actions are all unlocked 30K pieces of clothes, pants and other clothing Vehicles are fully unlocked, hoverboard and other vehicles Legendary prestige changes legs and wingspan with one key Gatorade Turn on fitness freaks and dominate accelerators You can change hands, legs, shoulder width Can change reputation to legend Ignore prestige, wear a mascot and be topless. NBA 2K21 Park By Ballin Hoop Director Park mc online and offline full ability badge virtual prestige clothes actions are all unlocked Online and offline, full badge full hot zone Unlock hidden functions, edit players Block actions are all unlocked 3k pieces of clothes, pants and other clothing Vehicles are fully unlocked, hoverboard and other vehicles Legendary prestige changes legs and wingspan with one key Gatorade Turn on fitness freaks and dominate accelerators. Works In All Mode! If you have any trouble running the 2K products, download these files to recover and help your device running the files. Note: When you downloaded, drag the files out of your winrar and put into a folder or on your desktop and run the application as administrator! Elite 3 in 3 days, does not spent much time! We sell those for the cheapest and the most reliable seller we are! Note: please follow the text tutorial inside the modifier! Configure exactly what should be visible for player esp and item esp while toggled on. Very useful for when you want a clearer screen during fights. Visibility checks Smart bone selection can aim at the nearest visible bone if preferred bone not visible Humanized smoothing Lock target Multiple aimkey configurations Buy Here How To Use Menu:. First you need to buy a key, purchase Here You do not wait for your access you get instant access, here is how to get started after purchase: Important information: Always check the status page by pressing HERE before buying and make sure it says "Working" Requirements: Windows 10 and windows 11 Does not work on windows 10 enterprise version! This hack is for PC only! Setup of your PC and instructions of how to run hack will be provided after purchase. Before the bot starts it will first make a live connection to test if your build is detected or not. If it ever becomes detected you can contact support for a new build free of charge. Buy Here. Special Looting Distance: Increase how far you can interact with loot Door Open Distance: Increase how far you can interact with doors Crouch Speed: Increase your pose changing speed crouch up n down very fast Air Speed: Reach max movement speed faster when jumping Air Lerp: Stay in the air longer, lower gravity Container open delay: open containers instantly Grenade speed: Throw grenades super far Hotkeys Hotkey Selector: Click on your feature and then press the desired key to set or ESC to remove the hotkey bind Aimbot activation: Hold to aim Hitbox cycle: Press to change hitbox. Mouse and memory Bone selection head, chest, hand etc. Read more below What are these icons? I personally only test on Windows 10 v with windows updates disabled, all antivirus and protections off. It is highly recommended to use this setup, other Windows versions might cause problems. EAC Spoofer When you get banned 24 hours after using the spoofer. If it changed, then it will probably spoof fine for you! Permanent spoof options Bios Volumes Persistent until you use the unspoof Registry Computer name change. Prev 1 2 Next Page 1 of 2. Followers 0. New Discord Server. Download Statistics Files. Latest File Apex: Legends [Swordman]. Apex Legends Exclusive. Fortnite FN - Pluto. Rust Premium Exclusive. Rainbow Six Siege Exclusive. The Cycle Frontier Exclusive. Valorant Deluxe. Call of Duty Vanguard. Ballin Hoop Squad Hacks. Apex: Legends [Swordman]. PUBG Exclusive. HWID Spoofer. Apex Legends: Storm. BH 2K22 Free Modifier. NBA 2K22 Mypoint. Week Month Year All. Total Members. Newest Member jasper Joined 57 minutes ago. Sign In Sign Up.
1 note
·
View note
Text
0 notes
Text
Listen, see, touch, taste, and smell, did you use these 5 senses marketing?
From brick-and-mortar stores to e-commerce, from e-commerce to new retail, products will eventually go back offline.
Why is that? Because customer experience is important, like when you go to the Apple Experience Store and experience the iPhone for yourself before you decide to buy it.
Customers' "five senses" experience is the most complete in offline stores, whether they buy offline or online. A product or a service, in order to achieve sales, it is necessary to touch point, that is, to establish the connection between the brand or product and the customer, and the sense is the most direct, the most effective contact point, is the "trigger" of the customer to buy, which is far more natural and easy than the human sales incentive.
Modern physiology, psychology research proved that people receive information from the outside world, more than 83% through the eyes, 11% with the help of hearing, 3.5% rely on touch, the rest from taste and smell. The development history of marketing can also reflect this point: visual marketing was first attached importance to and adopted by enterprises, and trademark (brand) protection is often limited to the visual part -- graphics and text, followed by hearing, smell and so on.
The greatest value of sensory marketing lies in the establishment of contact and the creation of experience. The essence of contact and experience is the transmission of information, and customers need to study and judge the value of information and make purchasing decisions that are beneficial to them. And information is made up of details; details are related to success or failure.
In the case of homogenization of goods or services, customers are often conquered by a single point, namely a product detail, or a prominent and subtle feeling. Sensory marketing can create one point after another.
How to create such dots?
Eyelash stores need to design experience scenes from hardware and software.
Hardware is mainly environment, props, etc. Software is mainly culture; atmosphere and so on, sometimes hardware and software are inseparable, integrated.
1) Environment
Including real environment and virtual environment, environmental elements can be divided into time, characters, space, color, etc., which is a direct element of customer experience.
2) Culture
Including corporate culture, brand culture, store culture, product culture, celebrity culture, etc., can be displayed by using invisible culture, such as store culture wall, activity silhouette, product culture manual, etc.
3) Atmosphere
The atmosphere of the store is mainly created through sound, light and other technologies, mainly including cultural atmosphere, festival atmosphere, buying atmosphere, etc.
4) Items
The equipment, appliances, supplies and software needed to achieve customer experience can be used with some good props, which can let customers into the drama and have a sense of ceremony.
How does a lash store use the "five senses" for marketing?
1) Audio marketing
Auditory marketing refers to the use of beautiful, or unique sound to attract customers' auditory attention, and in the minds of customers to form a unique voice.
For shops, hearing mainly comes from three aspects. The first is the product itself, such as the sizzling sound of steak fried in a steakhouse.
The second is the environment, such as the background music playing in the store;
The third is the transmission, such as the sound of the glue shaken by the eyelash division in the lashes shop.
For customers who cannot lie down for 2 hours, we can play light music to relieve customers' mood and eliminate tension.
In addition, in the process of operation, the lashartist needs to operate according to the standard procedures and speak the corresponding communication techniques simultaneously.
2) Visual marketing
The purpose of visual marketing is to improve the aesthetic sense of the store through visual means, to attract customers into the store consumption.
Such as shop head, window, commodity display and so on to attract customers have a vital role. Apart from displaying the corresponding products and tools, the eyelash store can display the eyelash operation process, eyelash style drawing and grafting comparison drawing for customers' reference.
3) Tactile marketing
Tactile receptors are abundant in the head, lips, tongue, and fingers, and can be used to express intimacy, kindness, gentleness and thoughtfulness.
As an eyelash artist, it is necessary to make full use of the touch. For example, when grafting eyelasheson customers' eyes, the operation should be light and the action should be gentle, so that customers will feel gentle and considerate and have a sense of security.
The establishment of taste difference can enable customers to establish taste recognition through taste experience, and attract customers to often recall the eyelash shop, or even patronize the shop.
For example, scented tea can soothe the mood and has a very good helping effect on the stability of nerves. According to the season, rose tea in spring and autumn, chrysanthemum tea in summer and ginger tea in winter are matched with rose tea.
5) Smell marketing
This is a marketing mode that allows customers to distinguish the differences of stores even with their eyes closed. Smell marketing refers to a marketing mode that attracts customers' attention and recognition with a specific smell and eventually forms a memory, which can increase the memory of products and services, such as choosing some essential oil and aromatherapy equipment and selecting the appropriate fragrance.
Your eyelash shop, in hearing, sight, touch, taste, smell, these five senses of marketing you have done? If not, look into how to improve it.
This is Our Lash, if you are looking for wholesale magnetic lashes, 3d mink lash vendors, eyelash extensions wholesale Korean or other kind of eyelash. Please contact with us.
#our lash#ourlash#eyelash extensions#lash extensions#lashes vendor#lash factory#eyelash factory#eyelash vendor#lashes extensions#lashes factory#lashes#eyelash#eyelashes#lash#lash vendors
0 notes
Text
Cannot Update App On Macbook

Apple MacBook Air 'Core i5' 1.7 13' (Mid-2011) Specs
MacBook (Early 2015 or newer) MacBook Pro with Retina display (Mid 2012 or newer) MacBook Air (Late 2010 or newer) Mac mini (Late 2012 or newer) iMac (Late 2012 or newer) Mac Pro (Late 2013) Gestures. Requires a Multi-Touch trackpad, Force Touch trackpad, Magic Trackpad, or Magic Mouse. Force Touch gestures require a Force Touch trackpad. Curious to see how an Apple MacBook can run Windows 10? We walk you through the steps of installing Windows 10 on the late-2016 MacBook Pro. Along the way, we share some tips and tricks and tell.
Identifiers: Mid-2011 - MC965LL/A* - MacBookAir4,2 - A1369 - 2469
All MacBook Air Models | All 2011 Models | Dynamically Compare This Mac to Others
Distribute This Page: Bookmark & Share | Download: PDF Manual
Cannot Update App On Macbook Shortcut
The Apple MacBook Air 'Core i5' 1.7 13' (Mid-2011/Thunderbolt) features a 32-nm 'Sandy Bridge' 1.7 GHz Intel 'Core i5' processor (2557M) with two independent processor 'cores' on a single chip, a 3 MB shared level 3 cache, 4 GB of onboard 1333 MHz DDR3 SDRAM (which cannot be upgraded after purchase), 128 GB or 256 GB of flash storage, and an Intel HD Graphics 3000 graphics processor with 384 MB of DDR3 SDRAM shared with system memory. This all is packed in a razor thin (0.11-0.68 inch), 2.96 pound, aluminum case with an integrated 'FaceTime' video camera, a backlit full-size keyboard and an 13.3' widescreen TFT LED backlit active-matrix 'glossy' display (1440x900 native resolution). Connectivity includes 802.11a/b/g/n Wi-Fi, Bluetooth 4.0, dual USB 2.0 ports and analog audio out as well as an SDXC card slot and a new 'Thunderbolt' port that is backwards compatible with Mini DisplayPort and likewise supports an external display at 2560x1600 and passes an audio signal as well. Thunderbolt also supports other peripherals that use the Thunderbolt standard which provides up to 10 Gbps of bandwidth in both directions. It lacks internal Ethernet (an external USB adapter was offered as a US$29 option) and lacks Firewire and optical audio in/out as well. Compared to its predecessor, this model has a very similar external enclosure, although it has the aforementioned Thunderbolt port, a backlit keyboard, and is slightly heavier. Internally, however, it has a faster processor, architecture and RAM as well as improved wireless capabilities. Also see:
What are the differences between the 'Mid-2011' MacBook Air models? Which is the best choice for my needs?
What are the differences between the 'Mid-2011' MacBook Air models and the 'Late 2010' MacBook Air that they replaced?
Buy This Mac at site sponsor OWC. Click for current options.
Buy This Mac (Business) at site sponsor Evertek. Bulk orders worldwide!
Upgrade This Mac at site sponsor OWC. SSDs, external storage & more.
Sell Newer Macs at A+ BBB rated site sponsor Cash For Your Mac. Quick quote!
Tech Specs
Ports
Global Original Prices
Popular Q&As
Click on a category for related details. The most commonly needed info is 'open' by default, but all info is important. Asterisks (*) reference data in details fields.
Introduction Date:July 20, 2011 Discontinued Date:June 11, 2012
Details:The 'Introduction Date' refers to the date a model was introduced via press release. The 'Discontinued Date' refers to the date a model either was replaced by a subsequent system or production otherwise ended. Also see: All Macs introduced in 2011.
Details:Also see: All models with a 64-Bit processor courtesy of EveryMac.com's Ultimate Mac Sort.
Details:Geekbench 2 benchmarks are in 32-bit and 64-bit modes, respectively. These numbers reflect an average of user provided 32-bit and 64-bit results as submitted to the Geekbench website. Higher numbers are better. You also might be interested in reviewing all 32-bit and 64-bit Geekbench 2 user submissions for Macs with the MacBookAir4,2 Model Identifier, which may include multiple models. To dynamically compare Geekbench 2 results from different Macs side-by-side, see EveryMac.com's Ultimate Mac Comparison.
Details:These Geekbench 3 benchmarks are in 32-bit mode and are for a single processor core and all processor cores, respectively. Both numbers reflect an average of user provided results as submitted to the Geekbench website. Higher numbers are better. You also might be interested in reviewing all 32-bit single core and multicore Geekbench 3 user submissions for Macs with the MacBookAir4,2 Model Identifier, which may include multiple models. To dynamically compare 32-bit Geekbench 3 results from different Macs side-by-side, see EveryMac.com's Ultimate Mac Comparison.
Details:These Geekbench 3 benchmarks are in 64-bit mode and are for a single processor core and all processor cores, respectively. Both numbers reflect an average of user provided results as submitted to the Geekbench website. Higher numbers are better. You also might be interested in reviewing all 64-bit single core and multicore Geekbench 3 user submissions for Macs with the MacBookAir4,2 Model Identifier, which may include multiple models. To dynamically compare 64-bit Geekbench 3 results from different Macs side-by-side, see EveryMac.com's Ultimate Mac Comparison.
Details:These Geekbench 4 benchmarks are are for a single processor core and all processor cores, respectively. All Geekbench 4 benchmarks are 64-bit. Both numbers reflect an average of user provided results as submitted to the Geekbench website. Higher numbers are better. You also might be interested in reviewing all single core and multicore Geekbench 4 user submissions for Macs with the MacBookAir4,2 Model Identifier, which may include multiple models. To dynamically compare Geekbench 4 results from different Macs side-by-side, see EveryMac.com's Ultimate Mac Comparison.
Details:These Geekbench 5 benchmarks are are for a single processor core and all processor cores, respectively. All Geekbench 5 benchmarks for the Mac are 64-bit. Both numbers reflect an average of user provided results as submitted to the Geekbench website. Higher numbers are better. You also might be interested in reviewing all single core and multicore Geekbench 5 user submissions for Macs with the MacBookAir4,2 Model Identifier, which may include multiple models. To dynamically compare Geekbench 5 results from different Macs side-by-side, see EveryMac.com's Ultimate Mac Comparison.
Processor Speed:1.7 GHz Processor Type:Core i5 (I5-2557M)

Details:This model is powered by a 32 nm, 64-bit Intel Mobile Core i5 'Sandy Bridge' (I5-2557M) processor which includes two independent processor 'cores' on a single silicon chip. Each core has a dedicated 256k level 2 cache, shares 3 MB of level 3 cache, and has an integrated memory controller (dual channel). This system also supports 'Turbo Boost 2.0' -- which 'automatically increases the speed of the active cores' to improve performance when needed (up to 2.7 GHz for this model) -- and 'Hyper Threading' -- which allows the system to recognize four total 'cores' or 'threads' (two real and two virtual). Also see: How fast are the 'Mid-2011' MacBook Air models compared to one another and to earlier MacBook Air models? How fast are these models compared to the 'Early 2011' MacBook Pro models?
Turbo Boost:2.7 GHz Custom Speeds:1.8 GHz (Core i7)
Details:A 1.8 GHz Core i7 (I7-2677M) processor was available via custom order for the MC966LL/A configuration (which has 256 GB of flash storage by default) as a US$100 upgrade. As requested by readers, EveryMac.com also has documented this custom configuration as its own model. Also see: How much faster are the custom configured Core i7-powered 'Mid-2011' MacBook Air models than the stock Core i5-powered models? Is the extra performance worth the extra cost?
Details:N/A
System Bus Speed:5 GT/s*Cache Bus Speed:1.7 GHz (Built-in)
Details:*This system has a 'Direct Media Interface' (DMI) that 'connects between the processor and chipset' in lieu of a traditional system bus. Intel reports that it runs at 5 GT/s.
Details:N/A
L1 Cache:32k/32k x2L2/L3 Cache:256k x2, 3 MB (on chip)
Details:Each core has its own dedicated 256k level 2 cache and the system has 3 MB of shared level 3 cache.
Details:Shipped standard with 4 GB of 1333 MHz DDR3 SDRAM onboard.
Details:*4 GB of RAM is onboard and it cannot be upgraded later. Also see: Actual Max RAM of All G3 & Later Macs.
Details:*There are no RAM slots. 4 GB of RAM is soldered onboard and cannot be upgraded later.
Details:This model has an Intel HD Graphics 3000 graphics processor that shares memory with the system.
Details:Apple reports that 'memory available to Mac OS X may vary depending on graphics needs' and that the minimum graphics usage is 384 MB for this model.
Built-in Display:13.3' WidescreenNative Resolution:1440x900
Details:13.3' color widescreen TFT LED-backlit active-matrix 'glossy' display with a 1440 by 900 native resolution. Apple reports that it also supports '1280 by 800, 1152 by 720, 1024 by 640, and 800 by 500 pixels at 16:10 aspect ratio; 1024 by 768, 800 by 600, and 640 by 480 pixels at 4:3 aspect ratio; 720 by 480 pixels at 3:2 aspect ratio'. In the UK, site sponsor ALB Repair offers component-level logic board repair, display repair, and other repair services for this MacBook Air. No fix, no fee! In Germany, site sponsor Conodi provides high quality Mac and PC repair services as well as remote home office setup and troubleshooting. In-person and mail order repair services include the display, motherboard, water damage and more for this MacBook Air. In Spain, site sponsor iRepairs provides affordable repair and data recovery services. In-person and by mail repair services include the display, battery, keyboard, motherboard, and more for this MacBook Air. In Singapore, site sponsor Esmond Service Centre provides highly regarded repairs for the display, motherboard, battery, water damage issues, and more, all with a free estimate and fast turnaround for this MacBook Air.
2nd Display Support:Dual/Mirroring2nd Max. Resolution:2560x1600
Details:The maximum resolution supported on an external display is 2560x1600.
Standard Storage:128, 256 GB SSDStd. Storage Speed:N/A
Details:The MC965LL/A configuration has 128 GB of flash storage and the MC966LL/A configuration has 256 MB of flash storage. Apple did not offer other capacities via custom configuration and it is not intended to be upgraded after purchase either. Also see: How do you replace or upgrade the storage in the 'Mid-2011' MacBook Air models? Is it even possible? In the US (and many other countries), site sponsor Other World Computing sells storage upgrades for this MacBook Air. In the UK, site sponsor Flexx sells storage upgrades for this MacBook Air. In Canada, site sponsor CanadaRAM sells SSDs and other upgrades for this MacBook Air. In Australia, site sponsor Macfixit sells storage upgrades for this MacBook Air. Also see: SSD Compatibility Guide for All G3 & Later Macs.
Storage Dimensions:Proprietary (2.2 mm)Storage Interface:Mini SATA (6 Gb/s)
Details:This model supports a single proprietary design SSD module with a Mini SATA (6 Gb/s) connector. It is 2.2 mm thick.
Details:*MacBook Air models do not have an internal optical drive. Site sponsor Adorama offers the external Apple USB SuperDrive for US$79. It writes DVD+R DL and DVD-R DL at 4X, DVD-R and DVD+R at 8X, DVD-RW at 6X, DVD+RW at 8X, reads DVD at 8X, writes CD-R at 24X, writes CD-RW at 16X, and reads CD at 24X. Site sponsor Other World Computing also has a variety of compact external optical drive options that may be of interest, including some with Blu-ray capability. Also see: What are the full capabilities of the external SuperDrive available for the MacBook Air? Can it be used with other Macs?
Details:*No MacBook Air models have an internal Ethernet port. However, an external Apple USB 10/100Base-T Ethernet adapter was offered as a US$29 option. Also see: What official and third-party adapters are available to connect the MacBook Air to wired Ethernet networks?
Standard AirPort:802.11a/b/g/nStandard Bluetooth:4.0
Details:802.11n (802.11a/b/g capable as well) Wi-Fi and Bluetooth 4.0 standard. As a minor point, Apple quietly stopped referring to the wireless networking (802.11n) as AirPort Extreme with this MacBook Air. Also see: What is 802.11n? How is it different from 802.11b, 802.11g, and 802.11a?
Details:Two 480-Mbps USB 2.0 ports, no Firewire ports. Also see: What is a good USB hub to use with the MacBook Air while traveling?
Details:This model has an SDXC Card slot. In the US (and many other countries), site sponsor Other World Computing sells a wide variety of external accessories, including docks, adapters, input devices, cases, and more for this MacBook Air. In Australia, site sponsor Macfixit offers an extensive selection of external accessories like docks, stands, chargers, cases, security products, and more for this MacBook Air. Also see: Which SD Card slot storage solution is best for the MacBook Air? Which models are compatible? Is this kind of storage safe?
Incl. Keyboard:Full-sizeIncl. Input:Trackpad (Inertial)
Details:Apple reports that the integrated keyboard has '78 (US) or 79 (ISO) keys, including 12 function keys, 4 arrow keys (inverted 'T' arrangement).' Unlike earlier MacBook Air models, it is backlit. For this MacBook Air, Apple did not formally mention the trackpad capabilities, but it is fully multi-touch capable. Also see: What are the differences between the trackpads in different MacBook Air models?
Details:This MacBook Air uses a razor thin aluminum case design with a 'catchless' magnetic latch.
Details:*MC965LL/A refers to the configuration with 128 GB of flash storage. Configured with 256 GB of flash storage the order number is MC966LL/A. Both are configured with 4 GB of RAM.
Apple Model No:A1369 (EMC 2469)Model ID:MacBookAir4,2
Details:Please note that these identifiers refer to more than one model. Also see: All Macs with the A1369 Model Number, the 2469 EMC Number, and the MacBookAir4,2 Model Identifier. For more about these identifiers and how to locate them on each Mac, please refer to EveryMac.com's Mac Identification section.
Details:Apple reports that this model has a 'built-in 50-watt-hour lithium-polymer battery' and the company claims that it can provide up to 7 hours of 'wireless web' use. Apple additionally notes that it provides 'up to' 30 days of standby time. Also see: What is the battery life of the 'Mid-2011' MacBook Air models in 'real-world' usage tests? Do the faster custom-configured Core i7 models have inferior battery life than the standard models? In the US (and many other countries), site sponsor Other World Computing sells quality batteries for this MacBook Air. In the UK, site sponsor Flexx is a local distributor of OWC batteries for this MacBook Air. In Australia, site sponsor Macfixit is a local distributor of OWC batteries for this MacBook Air.
Pre-Installed MacOS:X 10.7 (11A2063)Maximum MacOS:X 10.13.x*
Details:*This system fully supports the last version of OS X 10.8 'Mountain Lion,' OS X 10.9 'Mavericks,' and OS X 10.10 'Yosemite' as well as OS X 10.11 'El Capitan,' but advanced feature support is limited to Mac-to-Mac AirDrop, AirPlay Mirroring, and Power Nap. Other major features are not supported. It is capable of running macOS Sierra (10.12) as well, although it does not support the Universal Clipboard, Auto Unlock, or Apple Pay features. Finally, this model is capable of running macOS High Sierra (10.13), and it supports HEVC (High-Efficiency Video Coding), but it does not support hardware accelerated HEVC. It is not compatible with macOS Mojave (10.14) or later versions of the operating system. Also see: Which Macs are compatible with macOS High Sierra (10.13)? What are the system requirements? Which Macs support HEVC?
Cannot Update App On Macbook Computer
Minimum Windows:7 (32-Bit)*Maximum Windows:8.1 (64-Bit)*
Details:*Apple's Boot Camp 4 supports the 32-bit version of Windows 7 on this model. Boot Camp 5 supports the 64-bit version of Windows 7 and Windows 8. Earlier versions of Windows are not supported. Although Apple does not support Windows 10 via Boot Camp 5 (officially or otherwise), this system meets Microsoft's hardware requirements and it very well may be possible to boot Windows 10 on this Mac. If you have installed Windows 10 on this system (successfully or unsuccessfully), please share the results of your experiment. Thank you.
MacOS 9 Support:NoneWindows Support:Boot/Virtualization
Details:Also see: Are there any third-party programs to run Mac OS 9/Classic applications on Intel Macs? Site sponsor OHS specializes in heavily upgraded Macs capable of running both Mac OS X and Mac OS 9 applications. For more on running Windows on Intel Macs, please refer to the exhaustive Windows on Mac Q&A.
Dimensions:.11-.68 x 12.8 x 8.94Avg. Weight:2.96 lbs (1.35 kg)
Details:In inches while closed - minimum height to maximum height by width by depth, (0.3 cm-1.7 cm, 32.5 cm, 22.7 cm).
Original Price (US):US$1299, US$1599Est. Current Retail:US$300-US$500

Details:This MacBook Air was offered with 128 GB of flash storage (MC965LL/A) for US$1299 and 256 GB of flash storage (MC966LL/A) for US$1599. Both are equipped with 4 GB of RAM. Photo Credit: Apple, Inc.
Click on a category for additional details. The most commonly needed info is 'open' by default, but all info is important. The icons correspond with the icons for each port on the computer.
Video (Monitor): 1 (Thunderbolt) Floppy (Ext.): None
Details:This model is equipped with a Thunderbolt port in place of a Mini DisplayPort. It is backwards-compatible with Mini DisplayPort-equipped displays as well as adapters that are compatible with Mini DisplayPort (DVI, VGA, dual-link DVI and HDMI). It also can support other peripherals that use the Thunderbolt standard, which provides a maximum theoretical 10 Gbps of bandwidth in both directions.
Details:N/A
Details:N/A
Details:Two 480-Mbps USB 2.0 ports, no Firewire ports. Also see: What is a good USB hub to use with the MacBook Air while traveling?
Details:No internal modem or Ethernet. An external Apple USB 10/100Base-T Ethernet adapter was offered as a US$29 option.
Details:N/A
Details:Internal omnidirectional microphone.
Details:*Single analog audio output/headphone jack.
Details:N/A
Details:100V-240V AC, 45W 'MagSafe' power adapter.
Global original prices for the MacBook Air 'Core i5' 1.7 13' (Mid-2011) in 34 different countries and territories follow; organized alphabetically by region.
For global original prices for Intel Macs in one particular country on a single page, please refer to EveryMac.com's Global Original Prices section.
Original Prices - North & South America
Mexico:MXN $19,499, $23,999 United States:US$1299, US$1599
Original Prices - Europe
Denmark:DKK 9,799, 11,999Finland:€1279, €1579
Ireland:€1279, €1579Italy:€1249, €1499
Luxembourg:€1215,57, €1500,70Netherlands:€1249, €1499
Spain:€1249, €1499Sweden:SEK 11.995, 14.995
Switzerland:CHF 1'349, 1'649 United Kingdom:£1099, £1349
Original Prices - Asia
China:RMB 9,998, 12,498 Hong Kong:HK$9,998, HK$12,488
India:Rs 73,900, 89,900 Indonesia:Rp 12,499,000, 15,499,000
Japan:¥110,800, ¥138,800Korea:KRW 1,650,000, 1,990,000
Malaysia:RM 3,999, 4,999The Philippines:PHP 65,990, 79,990
Singapore:S$1,688, S$2,088Taiwan:NT$41,900, NT$51,900
Thailand:THB 42,900, 52,900Vietnam:VND 31,499,000, 38,999,000
Original Prices - Australia & New Zealand
Australia:A$1449, A$1799 New Zealand:NZ$1999, NZ$2499
If you have additional original prices for this model, please get in touch. Thank you.
Ten of the most popular Q&As about the MacBook Air models follow.
Permalink | E-mail a Friend | Bookmark & Share | Report an Error/Typo
Suggest an Addition | Sign Up for Bimonthly Site Update Notices
<< MacBook Air (Home) | Also see: MacBook Air FAQ
EveryMac.com is provided 'as is' without warranty of any kind whatsoever. EveryMac.com, and the author thereof, shall not be held responsible or liable, under any circumstances, for any damages resulting from the use or inability to use the information within. For complete disclaimer and copyright information please read and understand the Terms of Use and the Privacy Policy before using EveryMac.com. Use of any content or images without expressed permission is not allowed, although links to any page are welcomed and appreciated.
0 notes
Text
Mining on RX Vega 56: setup and selection
The higher the power of the mining equipment, the more crypto coins the owner receives. The mining rigs assembled on rx vega 56 demonstrate a higher hash rate than the previous series of AMD video cards. The fifth generation microarchitecture and many other technological innovations provide high overclocking of the rx vega 56 GPU in digital money mining. RX Vega 56 Specification: Video card mining - Main characteristics Video card in mining, the main characteristics Main characteristics: - Architecture - GCN 1.4. - Manufacturing technology of microcircuits - 14 Hm. - Graphics core area - 486 mm². - Number of transistors - 12500 million - Number of TMU — 224. - ROP quantity — 64. - Number of shrader units — 3584. - Core frequency - 1156 MHz. - Core frequency (TURBO) - 1471 MHz. - Memory frequency - 953 MHz. - Video memory type - HBM 2. - Video memory size - 8GB. - Bus bandwidth - 2048 pages. - Additional food — 8+8 pin. - power usage - 210 Watts. In terms of hashing speed, the graphics processor is not inferior, and on many coins it surpasses its competitors. If we compare radeon rx vega 56 vs 1080 ti, mining on the "red" card is more productive on popular algorithms Ethash and Cryptonight... Thanks to dual BIOS, when mining on rx 56 vega, you can change the parameters of the video card by moving the lever on the device panel. The backup BIOS has write protection, which makes it possible to restore the video accelerator after an unsuccessful firmware. People Also Ask: Common Questions Mining on RX Vega 56 Which model is the best for Mining on RX Vega 56? At the first place Gigabyte vega 56 The best mining card in AMD's line of vega GPUs. Exclusive cooler WindForce 2x, with powerful fans, copper heat pipes and a 2-section radiator, protects against overheating under severe loads. A low-noise, cold and relatively inexpensive video card is an excellent option for assembling a mining farm for the extraction of XMR cryptocurrency. Msi AIR Boosts Vega 56 has high performance mining. The manufacturer overclocks the GPUs at the factory. Setting the Boost mode, accelerates the core to the level of 1450 MHz, this is the best indicator in this line of Vega video cards. The hot air is removed by a two-slot cooling system with a powerful turbine. The powercolor vega 56 video card is available in several versions: - PowerColor Radeon RX Vega 56 Nano Edition compact card with one fan and no BIOS toggle switch. - PowerColor Radeon RX Vega 56 Red Devil made in the original style. The main feature of this model is 3 BIOS switching options: standard, quiet and OC BIOS. The function allows you to adjust the power consumption and the temperature for turning on the fans with one click of the toggle switch. - PowerColor Radeon RX Vega 56 Red Dragon resembles Red Devil in appearance, but has a shortened PCB, only two BIOS versions and an additional power connector 6 + 8 pin, instead of the usual 8 + 8, on other rx vega 56 models. On video accelerators series PowerColor radeon rx vega 56 mining is quite complicated in settings, but with proper overclocking, the card demonstrates good hash rates, and three fans reliably protect against overheating. Video accelerator Asus ROG Strix RX Vega 56 OC 8 GB equipped with proprietary utility Asus GPU Tweak II, with the function of automatic tuning to the maximum allowable frequencies. Led-backlight allows you to visually control the degree of heating of the asus rx vega 56 video card in the process of mining cryptocurrency. GPU Double Edition Vega RX 56 American company XFX, has 20% reduced dimensions in comparison with the reference version. The card has no factory acceleration, so the core frequency remains at its default values.. This concludes the review of models from different manufacturers. The test results showed that Vega cards for mining are quite promising. The full disclosure of the capabilities of the new architecture depends on the development of new software for mining cryptocurrencies. The new Nvidia 2080 model line competes well with the Vega series graphics cards. What to mine, profitable algorithm: Mining on RX Vega 56 How productive is ether mining on vega 56? AMD GPUs are traditionally focused on mining Ethash coins. The hashing speed of the vega 56 video card in ether mining depends on the overclocking potential of a particular model. On servers Ezil.me and Rustpool.xyz you can set up Merged mining cryptocoins ETH + ZIL... Merged mining is different from the traditional dual mining previously widely practiced on red cards when mining Ethereum. You mine ETH by connecting through one of the specified services to another pool (for example, Ethermine), and the system periodically switches you to a ZIL mining round (once every 1.5 hours). At the end of the round, you will be returned back to mining ETH. Basically, every merged mining implementation has an auxiliary chain and a parent blockchain. A prerequisite for collaboration is to use the same hashing algorithm. Money is also paid in two coins. As a result, you will receive an additional 10-12% profit. According to information from mining forums to increase productivity in cards vega rx56 upload bios from the flagship vega rx 64 model... But each owner does this at his own peril and risk, and no one guarantees the success of such experiments. The cards of this line have a high hash rate based on the Cryptonight algorithm.... Before Monero switched to the RandomX algorithm, mining of this altcoin was profitable, but this is already in the past. As of 06/22/2020, the first place in mining profitability for vega 56 is the coin Port Protocol (XHV) on the CryptoNightHaven algorithm. Brings a little less income Conceal (CCX), CryptoNightConceal algorithm. Forks of the kryptonite algorithm do not heat up the graphics adapters to excessively high temperatures, so it is recommended to transfer the rig to mining these tokens during the hot season. Moreover, they occupy the top lines of the rating in online services for calculating the profitability of mining. The AMD Vega series video cards also performed well with the new MimbleWimble POW protocol. Altcoins MWC-CT31 (Cuckatoo31 algorithm) and Grin-CT32 (Cuckatoo32 algorithm) are almost as profitable as digital coins Kryptonite and Ethash. For the fastest possible assessment of the market situation, experts use a mining calculator. Of course, the results they give are very approximate. The real hash rate and the amount of income can differ by 10-15%, both in plus and minus, but still it is worth paying attention to the data from these sites. Mining calculators: - Wattomine. - Coincalculator. Most users use a simple Nicehash service, where, after installation and a little setup, a smart program finds a beneficial algorithm itself. It is recommended to visit the service https://minerstat.com, here you will find hash rates and a list of profitable crypto coins for most models of video cards and ASICs. Hashrate on different algorithms: RX Vega 56 Hash rates may vary depending on the manufacturer of the video card, overclocking settings, operating system and mining software installed on a specific PC. New profitable projects periodically appear on the blockchain platform. AMD Radeon Vega 56 hashrate table: Mining algorithmMining speedCoreClockMemoryClockPower Limitpower usageEthash:(Etherum, Ethereum Classic Ubiq, Expanse, Pirl, Ellaism, Metaverse, Callisto)36.5 Mh / s10060080210WCryptoNightSaber:(BitTube)1380 H/s10060080200WCryptoNightHeavy:(Haven)1380 H/s10060080200WProgPow:(Bitcoin Interest,15.5 Mh / s10060080250WZhash:(Bitcoin Gold, Anon, BitcoinZ)34 Sol/s10060080230WCryptoNightConceal:(Conceal)3600 H/s10060080250WNeoScrypt:(Halcyon, Money, Live)1600 kh / s10060080230WX16R:(Ravencoin, serious, HelpTheHomeless;Motion, Nicehash-X16R)11 Mh / s10060080180WKawPow:(Ravencoin)15.5 Mh / s10060080250WCuckatoo31:(MWC-CT31)1,2 H/s10060080230W The owner of an rx vega 56 mining farm must constantly monitor the market in search of the most profitable developments. If, of course, he wants to quickly recoup the investment. Overclocking AMD Radeon Vega 56 At standard settings, any graphics accelerator in mining is unprofitable. The video card needs overclocking in mining, otherwise it will consume electricity in vain. Using the program MSI Afterburner it is possible to quickly overclock the video card. Optimal values are selected individually for each video card. For this video card, the optimal kernel settings will be: - Core Clock +100 - Memory Clock +600 - Power Limit 80 The hashing speed increases and the graphics card becomes profitable. For rx 56 vega overclocking settings, you can also use the utility WattTool. How to reduce energy consumption A powerful 3D graphics accelerator is a rather power-hungry device. The consumption of Vega 56 in mining is higher than that stated by the manufacturer in the technical parameters of the video card. To avoid excessively high electricity bills, undervolting (lowering the core voltage) is required. Will help here again WattTool program. In the program window, you need to change the voltage indicators in points P6 and P7(when controlled in manual mode, the voltage at lower frequencies will drop automatically). For the rx 56 vega, a 12% reduction (1.070 mV) is optimal, which will reduce the consumption of vega 56 in mining by 50 watts. Also in the program MSI Afterburner conveniently adjustable tension by stitching Power Limit. The optimal value is 80%, some video cards are able to hold a lower voltage, which has a positive effect on the payback period of the video card. Conclusion Cryptocurrency mining is not only a source of passive income, but also a promising investment. Many financial analysts are predicting a new and unprecedented rise in the value of virtual assets. One can be skeptical about such predictions. But the fact that bitcoin, and behind it and other coins, having arisen from oblivion, have become a real financial instrument cannot be refuted. Some experts believe that the virtual asset mining market has already stabilized. Miners shouldn't expect super-profits, but a new crypto winter is unlikely to come either. Predictability has always attracted institutional investors who will play an increasing role in the development of the crypto industry. One of the main factors determining a successful investment is the price of the electrics in your area. Mining farms operating on free or the cheapest electricity remain profitable in any market situation. Read the full article
0 notes
Text
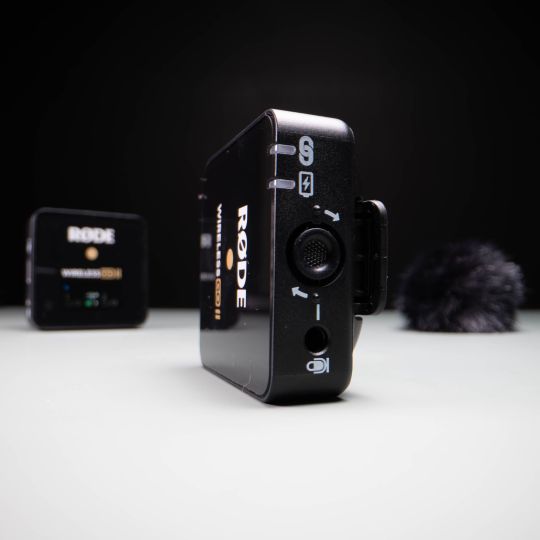
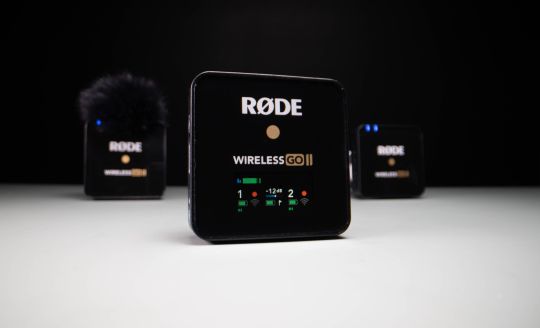
Rode Wireless Go II Review: More than an Upgrade. It's a Game-Changer
Rode Wireless Go II
9.50 / 10
Read Reviews
Read More Reviews
Read More Reviews
Read More Reviews
Read More Reviews
Read More Reviews
Read More Reviews
Read More Reviews
Read More Reviews
Read More Reviews
Read More Reviews


Shop Now
The Rode Wireless GO II is a no-compromise compact wireless microphone system that gives you the most flexibility and peace of mind when recording audio.
Key Features
200m range (line of sight)
Dual channel recording
Universal compatibility - 3.5mm TRS analog, USB-C and iOS digital output
7 hours battery life
On-board recording – over 40 hours of compressed or 7 hours uncompressed
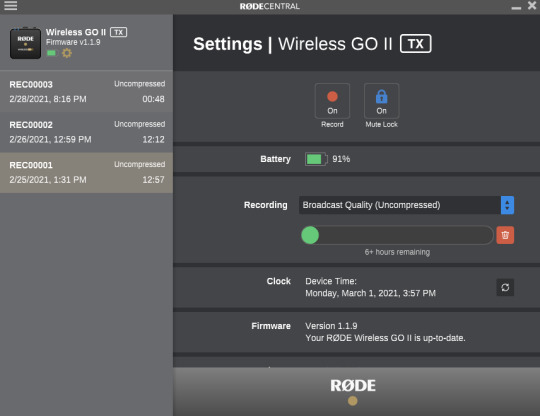
New Rode Central app compatibility
Specifications
Brand: Rode
Type: Series IV 2.4GHz digital transmission, 128-bit
Pattern: Built-in omnidirectional condenser
Power: USB-C
Battery: 7 hours
Connector: 3.5mm TRS analog, USB-C
Pros
Internal audio recording
Safety channel
Incredible wireless range
Rode Central app adds several new features and recording modes
Windscreens attach securely and allow for clean outdoor recording
Cons
Transmitters do not have displays
Lapel microphone is not included
Non-line of sight range is significantly less
Buy This Product
Rode Wireless Go II other
Shop
// Bottom var galleryThumbs1 = new Swiper('.gallery-thumbs-1', { spaceBetween: 10, slidesPerView: 10, freeMode: true, watchSlidesVisibility: true, watchSlidesProgress: true, centerInsufficientSlides: true, allowTouchMove: false, preventClicks: false, breakpoints: { 1024: { slidesPerView: 6, } }, }); // Top var galleryTop1 = new Swiper('.gallery-top-1', { spaceBetween: 10, allowTouchMove: false, loop: true, preventClicks: false, breakpoints: { 1024: { allowTouchMove: true, } }, navigation: { nextEl: '.swiper-button-next', prevEl: '.swiper-button-prev', }, thumbs: { swiper: galleryThumbs1 } });
Rode has recently released the successor to their very popular and industry leader Rode Wireless Go. But have they made added enough new features and tools to this upgraded model to make it worth checking out?
If you’re looking for a no-compromise compact wireless microphone system that gives you the most flexibility and peace of mind when recording audio, Rode’s new Wireless GO II should be at the top of your list.
youtube
After using the Rode Wireless Go II for the past few weeks, it will now be replacing two major parts of my existing audio recording kit. I'll share the unique advantages of using a wireless system like this and how it has helped me more efficiently and reliably record audio compared to my past solutions. Watch our video review of this wireless system for audio tests and comparisons.
Improvements and Key Features
In its updated model, the Rode Wireless Go II has increased its range and stability to 200m/656 feet with a direct line of sight (more than double that of the original Rode Wireless Go at 70m). It's added dual-channel recording with its second transmitter which allows you to now record two microphones simultaneously. And even more importantly for content creators like myself, the transmitters now can record audio directly and automatically with their built-in memory. This last update is the biggest game-changer and has allowed me for the most part to not need a separate external audio recorder like the Zoom H1n to save files.
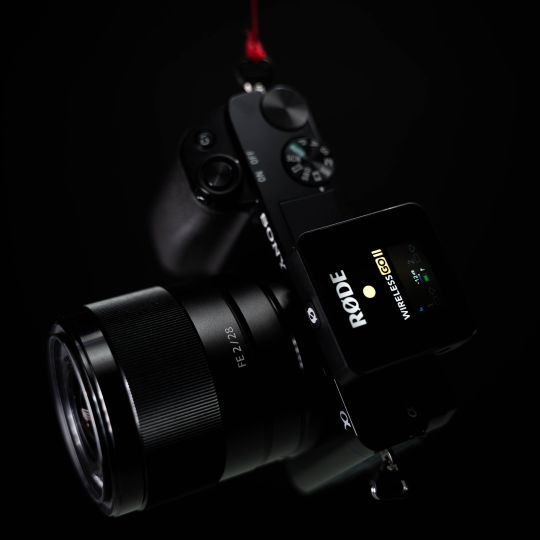
There are also several other great features either carried over from their previous model or improved upon that when combined with those first three points, make the Rode Wireless Go II an extremely versatile tool for recording high-quality audio wirelessly and my new Go-II choice.
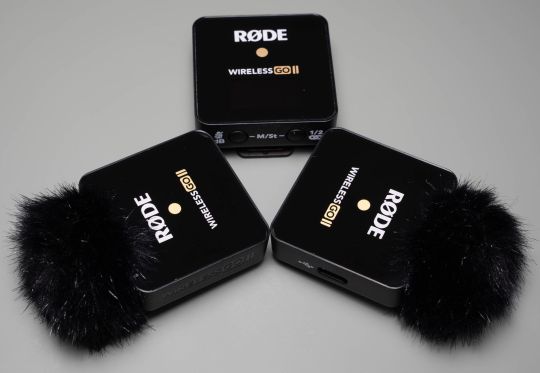
In my experience, this has been the easiest, the fastest, and most reliable wireless system I’ve used to record audio. Throughout this review, I’ll focus on the key areas that make this possible, which include:
Various recording modes
Connectivity options
Range and reliability
Many of these updates and new features are reliant on Rode's new Windows/Mac app called Rode Central. And while this updated Wireless Go II is a fantastic upgrade, there are of course a few quirks and areas (mostly related to the Rode Central software that I’ll cover later) that I think can be improved upon.
What's Included?
The main part of the kit consists of one receiver and two transmitters. They are about the same size and weight and all three have clips on the back which double as cold-shoe mounts.
Three short USB C to type A cables are included which support charging, data transfer, and live recording to compatible devices.
There's also a short red TRS to TRS cable. It feels durable and designed to last a long time. It’s designed to bend and hold its shape for easier connectivity and to help keep it out of your shot.
Specially designed to fit over the internal mics, you three windscreens are provided to help reduce low-frequency noise usually caused by wind. I like how they securely twist on to the transmitter's mics to prevent them from accidentally falling off when in use. It’s also nice of them to include a third windscreen as a back up too.

Lastly, you have a nice soft carrying pouch to store and transport everything. At first, I was a little concerned by it not being a hard case, but in my experience, it offers sufficient protection from external forces. I figure this also helps keep the overall size of the kit as small as possible. On the other hand, I would have liked for the inside of the pouch to have individual pockets or dividers to better keep the receiver and transmitters from bumping up against each other.

That said, when you tightly pack everything up in the carrying pouch, there isn’t much room for anything to slide around, but I could potentially see this leading to more dings and scrapes down the road. The entire kit isn't much larger than my iPhone 11.
Notably Missing
Unlike every other similar wireless audio kit I’ve reviewed and tested, the Wireless Go II does not include a lavalier microphone. For pro users, this likely isn’t a big deal as they might already have a preferred microphone they want to use. Often the microphones included with wireless kits aren’t the highest quality, so they’re replaced with better and more expensive ones, especially for higher production shoots. But an included budget microphone is still better than none at all, especially if you’re just starting off and don’t have one already.
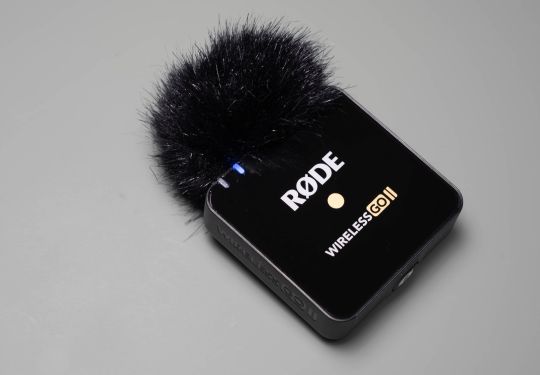
As with the original Rode Wireless Go, I wish that the transmitters themselves also had a display on them. For times when reaching and looking at the screen on the receiver isn't practical, having your key information displayed on the transmitters would be very helpful. Comparable systems at a minimum display battery life, signal strength as well as audio levels.
Similarly, other systems I've tried out also include gain control levels on the transmitters themselves for added flexibility and ease of use when you can’t access the receiver or need to make quick changes.
Optional Accessories
Rode offers a wide selection of first-party accessories which you can also pick up to expand the versatility and compatibility of your kit.
In my case, I got the USB-C to Lighting cable as it allows me to directly record into my iPhone 11. This was plug-and-play and worked flawlessly.
The MagClip GO also looks very interesting and seems like it would be a convenient way to attach your transmitters to talent or yourself more easily compared to their basic clips.
A Budget Comparison
A few weeks ago I reviewed the Bietrun WXM22, a $99 wireless system that on paper seems to be very similar to the Rode Wireless Go II. At their core, they are both compact systems that transmit audio wirelessly with virtually no latency. These tools both market themselves towards the mobile creator who wants the flexibility to record without wires.
And so, at about three times the price of the budget Bietrun, does the Rode offer enough to justify its price?
Basic Similarities
Both systems are about the same size and share many of the same ports and buttons on the receiver. The transmitters have Omni-directional mics for recording audio as well as have support for 3.5mm TRS inputs for compatible external mics.
Gain control is supported, however on the Rode this is done via the receiver itself vs on the transmitter with the Bietrun.
Both lack a dedicated headphone jack for monitoring audio. Depending on how you plan to use this setup, it could make it trickier to get your levels right without the need for additional adaptors.
The "Rode" to Success
Now here’s where things start to differ and we see the Rode flex its features.

As far as what’s included, the Rode Wireless Go II kit includes two transmitters instead of just the one with the Bietrun. The benefit of course is that you can record two audio sources at the same time instead of just one.
Most will likely use the two transmitters to mic up two different talents, but beyond that, it can also be useful when recording a single source but with a backup or alternative track as well.
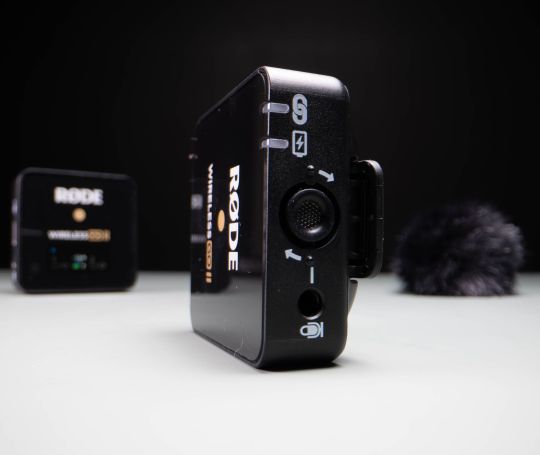
The range is advertised to be four times that of the Bietrun (200m vs 50m). As I demonstrate in my range test in the video review, 200m is probably more than you would ever need. Even in my original review of the Bietrun WXM22, I mention that 50m is also plenty for most realistic uses with these wireless systems. At 200m I’m not even visible on camera, but of course, I’ll never complain about having too much range.
Something to note, though, is that this range claim is heavily reliant on having a clear line of sight between the transmitter and receiver. In my tests, I found that with the transmitter attached to my collar, turning my back to the receiver resulted in dropouts from about the 40m range.
I was a bit surprised with this limitation even at these closer ranges. It seems though, turning my body was enough to completely cut out the signal as I was able to get decent connectivity all the way up to about 600ish feet when I had the transmitter facing the receiver.
No Interference
Aside from that one downside, though, its wireless connectivity did not seem to have any noticeable impact on sound quality. When indoors, the Bietrun had a faint low-frequency static/hiss sound that was especially noticeable during quieter recording sessions when I was just doing voiceovers. While I couldn’t exactly pinpoint the source, it would seem that some assortment of wireless interference was to blame. I had similar issues with another competing wireless system, the Comica Boom XD. While it's more comparable in quality and features to the Rode, it was very susceptible to interference from other electrical devices including my non-wireless Zoom H1n audio recorder. This made using the Comica much more difficult to set up and get clean audio out of due to this weakness.
Luckily the Rode Wireless Go II excels here. Even indoors, where I usually have the most difficultly eliminating these sources of interference, its wirelessly transmitted audio sounded as good compared to the internally recorded files it saved. This is the first of many peace of mind features.
Game-Changing Features
In addition to sounding great and working very well in those dense wireless areas we just discussed, the Rode Wireless Go II will continue to record audio internally even when it has weak or no signal at all.
After you update your transmitters and receiver via the Rode Central app, you will be able to use its new features.
More Control
When connected via their USB-C cables to the app, you can opt to use a 10-step gain level adjustment, which changes by 3dB, compared to the standard three-step.
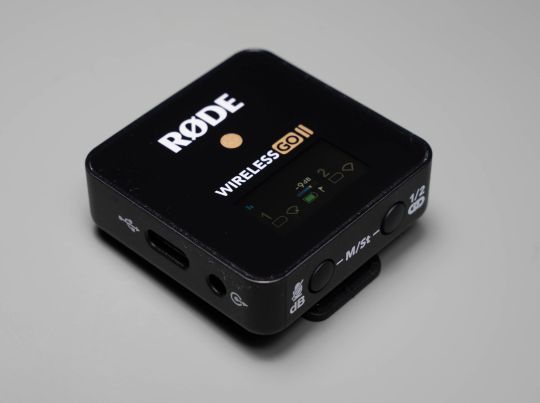
Playing it Safe
You have the option to enable recording a -20db safety track to one of the mono channels while the regular audio levels record to the other mono channel. This is especially great when dealing with highly inconsistent audio levels and you want to avoid peaking and clipping.
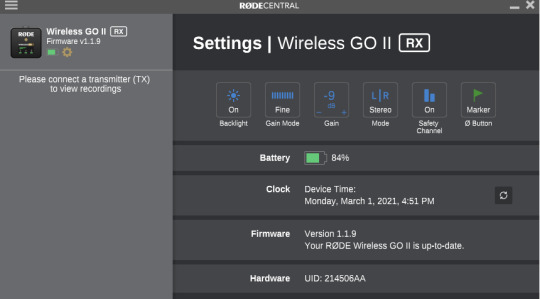
Keep in mind that with this option enabled you won’t be able to separate your audio from the 2 transmitters as they will be recorded together. You will need to disable recording a safety track if you want to keep them in separate mono channels.

Auto Recording Changes Everything
Most exciting, though, is that the app can enable recording directly to the transmitters with its built-in storage. This is a very big deal and in my opinion, the Rode Wireless Go II's biggest feature.
In every microphone or audio recording review I've shared, I make a point to mention if the product in question either helps or is more frustrating to set up and make sure I have the audio recording correctly. The biggest culprit in my personal experience is remembering to hit the record button on my Zoom H1n or even remembering to bring spare batteries for it.
With the Rode, I don’t really need an external recorder now as its core functionality is built right into each transmitter. Sure, I don’t have the same level of control and file types to choose from, but I am willing and able to give that up in a heartbeat if it means there is one less piece of gear I have to remember to bring, setup, and of course, hit record on.
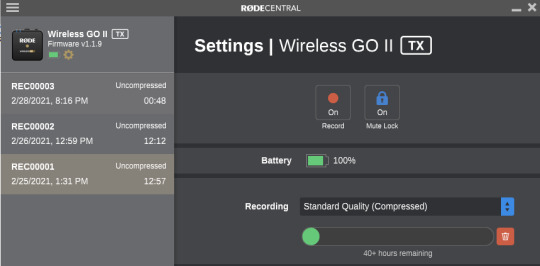
Via the Rode Central app, you can choose between recording 40+ hours of compressed audio or about 7 hours of higher quality compressed. I have mine set to compressed as that’s all I need to make these kinds of review and tech videos.
At first, I thought I’d dislike that the transmitter automatically starts to record audio when it pairs with the receiver. But going back to what I just said, the biggest thing that frustrated me and took the most time with my old setup, was that I always forget to press record. As simple as it was, every now and again I'd forget and I would have to re-record everything when I realized my error. Now that the Rode is set to record automatically, this is one less thing I have to worry about.
On the other hand, I sometimes feel that I want the option to hit stop and start and have more control over when the transmitters are actually recording. And while that might at times make it a little easier in post to edit my audio files as they are more condensed, I would rather have peace of mind knowing all my audio was recorded.
As far as the recording limits go, 40 hours and even 7 hours of recording is more than enough for an entire day of shooting for most people. After each recording session, I connect the transmitters to the Rode Central app to download and export my files.
It's great that the app can connect to all your devices at once instead of one-by-one. The app displays your file's waveform and allows you to quickly scrub through it and listen. It also shows markers which are either indications of the transmitter going out of range or manual ones you added via the transmitter itself by clicking the power button.
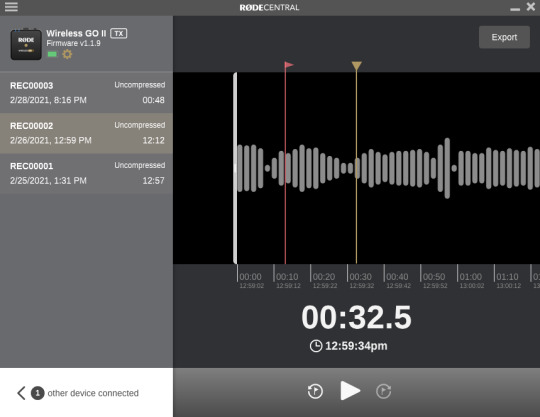
On the off chance that I forget to delete my old recordings, the transmitters automatically will begin to overwrite your recordings in order of oldest. Going back to wishing the transmitters having displays, the remaining storage space would have been another thing for them to display.
I Walk a Lonely "Rode"
Finally, I want to discuss some of the minor quirks with the Rode Central app. The added features it can enable or change are great and definitely are a big part of what makes the Rode Wireless Go II my favorite wireless audio system currently. It offers a simple and clean interface that works well... for the most part.
Most likely due to it being a relatively new app, I found the experience to a bit buggy at times. Connecting the transmitters specifically to the app frequently required me to unplug and reconnect the USB C cable a few times until the app would detect and allow me to browse its internal storage. Oddly, it detected the transmitter each time and showed its battery life, but said it wasn’t able to browse the recordings.
Another more annoying bug was that one saved recording on my transmitter always seemed to have issues when exporting via the app. I ended up with two identical partially exported clips which failed at the same exact timestamp. I’m not entirely sure why this was. All of my remaining clips exported without issues on both transmitters. Unrelated to exporting, I did have a few other random times where the app completely crashed and I had to restart it.
Moving past those issues, the app is still a welcome addition to the recording experience. I imagine with future updates many of these issues can be easily ironed out. I would also like to see Rode release a mobile app that can change these settings with your phone or tablet, devices that are more accessible when out shooting, instead of needing a PC or Mac each time.
That said, it would have been even better if these features could be enabled or changed on the “GO” without the need to connect to the companion app at all. Going back to my earlier points, a built-in screen on the transmitters and some additional buttons likely could have achieved this.
Is This the "Rode" for You?

Compared to every other comparable compact wireless audio system I’ve tested out, the Rode Wireless Go II offers the most complete, easy to use, and reliable experience. Despite a few of its quirks, many of which related to early software bugs, the Rode provides the best sound quality and performance. In addition to not having any noticeable signal interference, a common issue I've had with similar systems, it also is the only one to offer built-in audio recording as either a fail-safe or your primary source.
Rode Wireless Go II Review: More than an Upgrade. It's a Game-Changer published first on http://droneseco.tumblr.com/
0 notes
Text
Parallels Desktop 12 For Mac

Parallels Desktop 12 Crack With Keygen. Parallels Desktop 12.2.1 Crack is virtualization platform which allows using Windows OS on the Mac devices. It’s decent software in the virtual store. Parallels Desktop Cracked is another instrument for influencing an ideal answer for running your Window on the MAC working framework.
Parallels Desktop for Mac Pro Edition is the easiest and most powerful solution for developers, power users, and other demanding pros looking to increase productivity. Enhanced memory (64 GB RAM) and processing power (16 vCPU) for improved performance. 1-year subscription for one Mac. Subscription can be canceled at any time.
Parallels Desktop 12 for Mac can be purchased for $79.99, or those already using Parallels 10 or 11 can upgrade for $49.99, so very similar to the purchase and upgrade options of the past.
Parallels Desktop 15 Crack for Mac with Activation Key Torrent Free Download Parallels Desktop 15 Crack for Mac Overview: Parallels Desktop 15 Crack for Mac helps to run thousands of Windows applications such as Microsoft Office, Internet Explorer, Access, Quicken, QuickBooks, Visual Studio, even graphics-intensive games and CAD programs without interrupting performance or restarting.

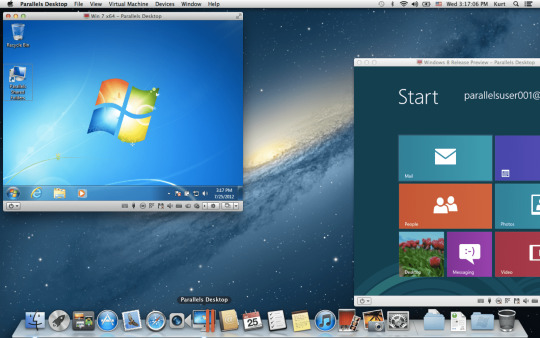
Parallels Desktop 12 for Mac 12.1.2 (41525) addresses overall stability and performance issues and includes the following fixes and improvements: Introduces a new option for virtual machine that use all displays in fullscreen - 'Activating virtual machine shows all. Offers an updated virtual.
Parallels Desktop 12 Crack is a software that is developed by the Parallels, Inc. This professional software giving hardware virtualization for the Macintosh PC with an Intel processor.
Parallels Desktop 12.2.1 Keygen is an excellent solution for your PC. You can reboot your PC and windows with only one click. It gives a virtual solution for the desktop. There are several remote connection designs for the user. You can connect or share the network always. It gives a strong network connection. You can easily run os on windows. It enhances the user performance. It supports for Multi-language.
Parallels Desktop 12 Key Generator is a world’s fastest and most powerful way to run the Windows on your Mac without the start up again. It is a multiple view mode that gives you full control of the level of union between the Windows and Mac. You can be liking it by having a faction of tools with no complexed settings. It also used to simplify all tasks. It will run the Windows applications like as Quick-books, Quicken, Internet Explorer or CAD programs. You will enjoy its performance without any imperiling on the rebooting. It will help you to clearly transfer everything like as documents, games, applications even your internet browser preferences on your current system.
Parallels Desktop 12.2.1 Crack Features

It gives Real synchronization.
It is compatible with all Windows.
It has an automatic installation wizard.
It enhanced the system performance.
Adobe Photoshop CS6 Crack.
How To Install?
Download the Parallels Desktop 12 Crack.
After downloading.
Nowe, open the crack setup.
Its fully working.
Bingo.
Parallel Desktop 12.2.1 For Mac incl Crack + Product Key Free – Idmactivator was last modified: July 25th, 2018 by
Parallels Desktop 12 For Mac System Requirements
Incoming search terms:
Parallels Desktop 12 Crack

Parallels Desktop 12 Crack
parallels desktop 12 product key
0 notes